Another interesting recipe from the masterchef Venkatesh Bhat from his briyani special episode (Watch the full episode here) which I tried for a sunday lunch. I have always been a big fan of him and I still have plenty of recipes from his collections yet to be tried. Never knew Briyanis can be made in so many different variations with different ingredients and flavours. He comes out with varied briyani varieties, that too vegetarian :):)
This is one such vegetarian briyani recipe, that uses juicy paneer(cottage cheese) and Methi. This aroma of Methi is the punch for this recipe. Hence, I do not add coriander or pudhina to this briyani as it might overshadow the significant aroma of Methi leaves.
This is my favourite combo and making this into briyani was really exciting. Let's quickly check out the recipe for this mild, aromatic and flavourful chunky Briyanis.

4. Heat a heavy bottomed pan, add ghee and all ingredients under "Masala". Add Onions,green chili and ginger garlic paste. Saute well until the onions are cooked and become translucent.
5. Add the marinated paneer, methi leaves and fried onions and mix well. Add needed amount of salt after checking. Cook the mixture on low flame for about 10 mins.
2. Take a big heavy bottomed pan/cooker for dum cooking.
3. Layer the Methi Paneer gravy first. Add the remaining rice on top of the gravy as second
layer.
4. Sprinkle the saffron + milk all over the rice as shown in the picture.
5. Place a Dosa Tawa on flame. Transfer the dum cooking handi/pressure cooker pan to dosa tawa and cover the pan tightly so that no heat escapes.( as shown below)
6. Cook for about 15 mins on low flame with the pan fully sealed.

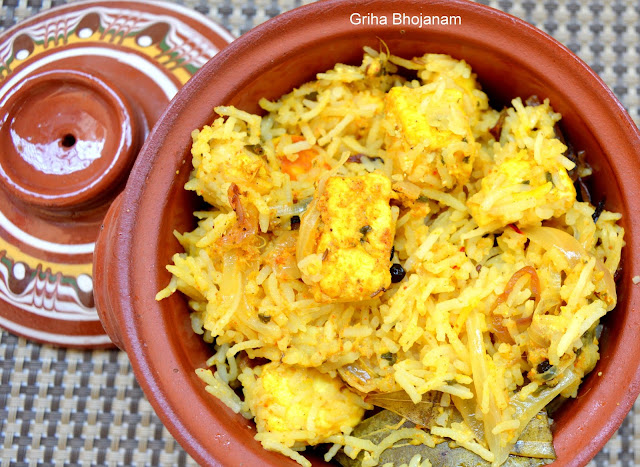
7. Methi Chaman Briyani is all ready and piping hot to be served along with any raita of your choice :)

This is one such vegetarian briyani recipe, that uses juicy paneer(cottage cheese) and Methi. This aroma of Methi is the punch for this recipe. Hence, I do not add coriander or pudhina to this briyani as it might overshadow the significant aroma of Methi leaves.
This is my favourite combo and making this into briyani was really exciting. Let's quickly check out the recipe for this mild, aromatic and flavourful chunky Briyanis.

Ingredients
- Fresh fenugreek leaves (methi) - 1/2 small bunch
- Paneer (cottage cheese) - 200 gms (cut into cubes)
- Basmati Briyani Rice - 1.5 cups
- Saffron (kesar) - 6-7 strands
- Milk - 1/2 cup
- Ghee - 3 tablespoons
- Onions - 3 large (Thinly sliced)
- Green chillies - 2 slit
- Fried onions - 1/2 cup
- Ginger garlic paste - 1 tbsp
- Salt - 1.5 tsp
Masala Ingredients
- Green cardamoms - 2
- Black cardamom - 1
- Cloves - 3-4
- Cinnamon -1 inch stick
- Bay Leaf - 1
- Black peppercorns - 5-6
For Marination
- Thick Yogurt - 1 Cup
- Turmeric powder - 1 tsp
- Ginger Garlic Paste - 2 tbsp
- Coriander powder - 2 tbsp
- Roasted Cumin powder - 1 tbsp
- Red chilli powder - 1 tsp
- Garam masala powder - 2 tsp
- Needed Salt

Method
Marinating the Paneer
1. Marinate the paneer cubes with ingredients listed under "Marination". Let the paneer cubes remain soaked in the marinated yogurt mixture for half hour. This helps all the flavours to be absorbed inside the paneer and also helps it become soft. |
| Paneer cubes marinated in yogurt and spices |
Cooking the Basmati Rice
2. Wash the Basmati Rice 2 times well for the excess starch to get rinsed off. Boil the basmati rice with a tbsp of ghee ,enough water and 1.5 tsp of salt till it is cooked about 90 percent. Drain the rice and keep it aside for dum cooking with the gravy. You can feel it by breaking the rice. |
| 90 percent Cooked Basmati Rice |
Preparing Methi Paneer Gravy
3. Discard the roots of the methi leaves. Chop the leaves and tender stem part finely. Wash them thoroughly to get rid of mud and the bitter taste.4. Heat a heavy bottomed pan, add ghee and all ingredients under "Masala". Add Onions,green chili and ginger garlic paste. Saute well until the onions are cooked and become translucent.
5. Add the marinated paneer, methi leaves and fried onions and mix well. Add needed amount of salt after checking. Cook the mixture on low flame for about 10 mins.
 |
| Preparing the Methi paneer gravy |
Layering of Briyani
1. Soak strands of saffron in 1/2 cup of warm milk overnight or for about half hour. |
| Saffron soaked milk |
2. Take a big heavy bottomed pan/cooker for dum cooking.
3. Layer the Methi Paneer gravy first. Add the remaining rice on top of the gravy as second
layer.
 |
| Layering of Paneer Methi Masala |
4. Sprinkle the saffron + milk all over the rice as shown in the picture.
 |
| Layering of rice topped with Saffron milk |
Dum cooking
5. Place a Dosa Tawa on flame. Transfer the dum cooking handi/pressure cooker pan to dosa tawa and cover the pan tightly so that no heat escapes.( as shown below)6. Cook for about 15 mins on low flame with the pan fully sealed.

7. Methi Chaman Briyani is all ready and piping hot to be served along with any raita of your choice :)


