Showing posts with label International cuisine. Show all posts

Monday, 27 July 2020

No Yeast No Oven Vegetable Pizza

In this tough time of lock down, it is really impossible and tough to order pizza from outside considering the health and safety. What if I say that pizza can be made easily at home without even an oven. Yes!!!!! This pizza turned out super amazing and soft with all the favorite toppings. Trust me... This was as good as any dominoes or Pizza hut Pizza and yet pocket friendly. This is made with homemade pizza and pasta sauce which is also super easy to make. Homemade is always bliss and gives you the best satisfaction one can ever get. In this recipe, I have used roasted garlic powder,parsley and oregano for a additional flavor to make the base. You can very well skip it if you want the base to be plain. But trust me, this adds lovely flavor to the crust.


Serves: 2 Pizzas

Ingredients

For the Dough

  1. All purpose Flour - 2 cups
  2. Curd/Yogurt - 1/4 cup
  3. Baking Powder - 1/2 tsp
  4. Baking Soda - 1/4 tsp
  5. Salt - 1/2 tsp
  6. Oil - 2 tbsp (Vegetable or olive oil)
  7. Roasted Garlic Powder - 2 tsp (Optional)
  8. Parsley - 1 tsp
  9. Oregano - 1 tsp
  10. Water - 3/4 cup
  11. Sugar - 1 tsp

For the Toppings

  1. Homemade Pizza and Pasta Sauce - As needed to spread
  2. Mozzarella Cheese - cubed or grated ( 1.5 cups )
  3. Red chili powder / Paprika powder/ Red chili flakes- 1 tsp for each pizza(as per taste)
  4. Oregano seasoning/ Mixed Italian Seasoning - as per taste
  5. Veggies of your choice - Jalapenos,Baby corn,Olives,Tomatoes,capsicum,corn,onion (as show in the picture)


Method

1. Add the dry ingredients and wet ingredients mentioned under the "Dough" and combine well. Knead nicely for 5 mins into a pliable soft dough. The real trick lies in the kneading for pizza to come out really soft. Sieve the flour, baking powder and soda to get rid of any particles so that the dough is smooth. Cover with a moist cloth and keep it aside for about an hour.


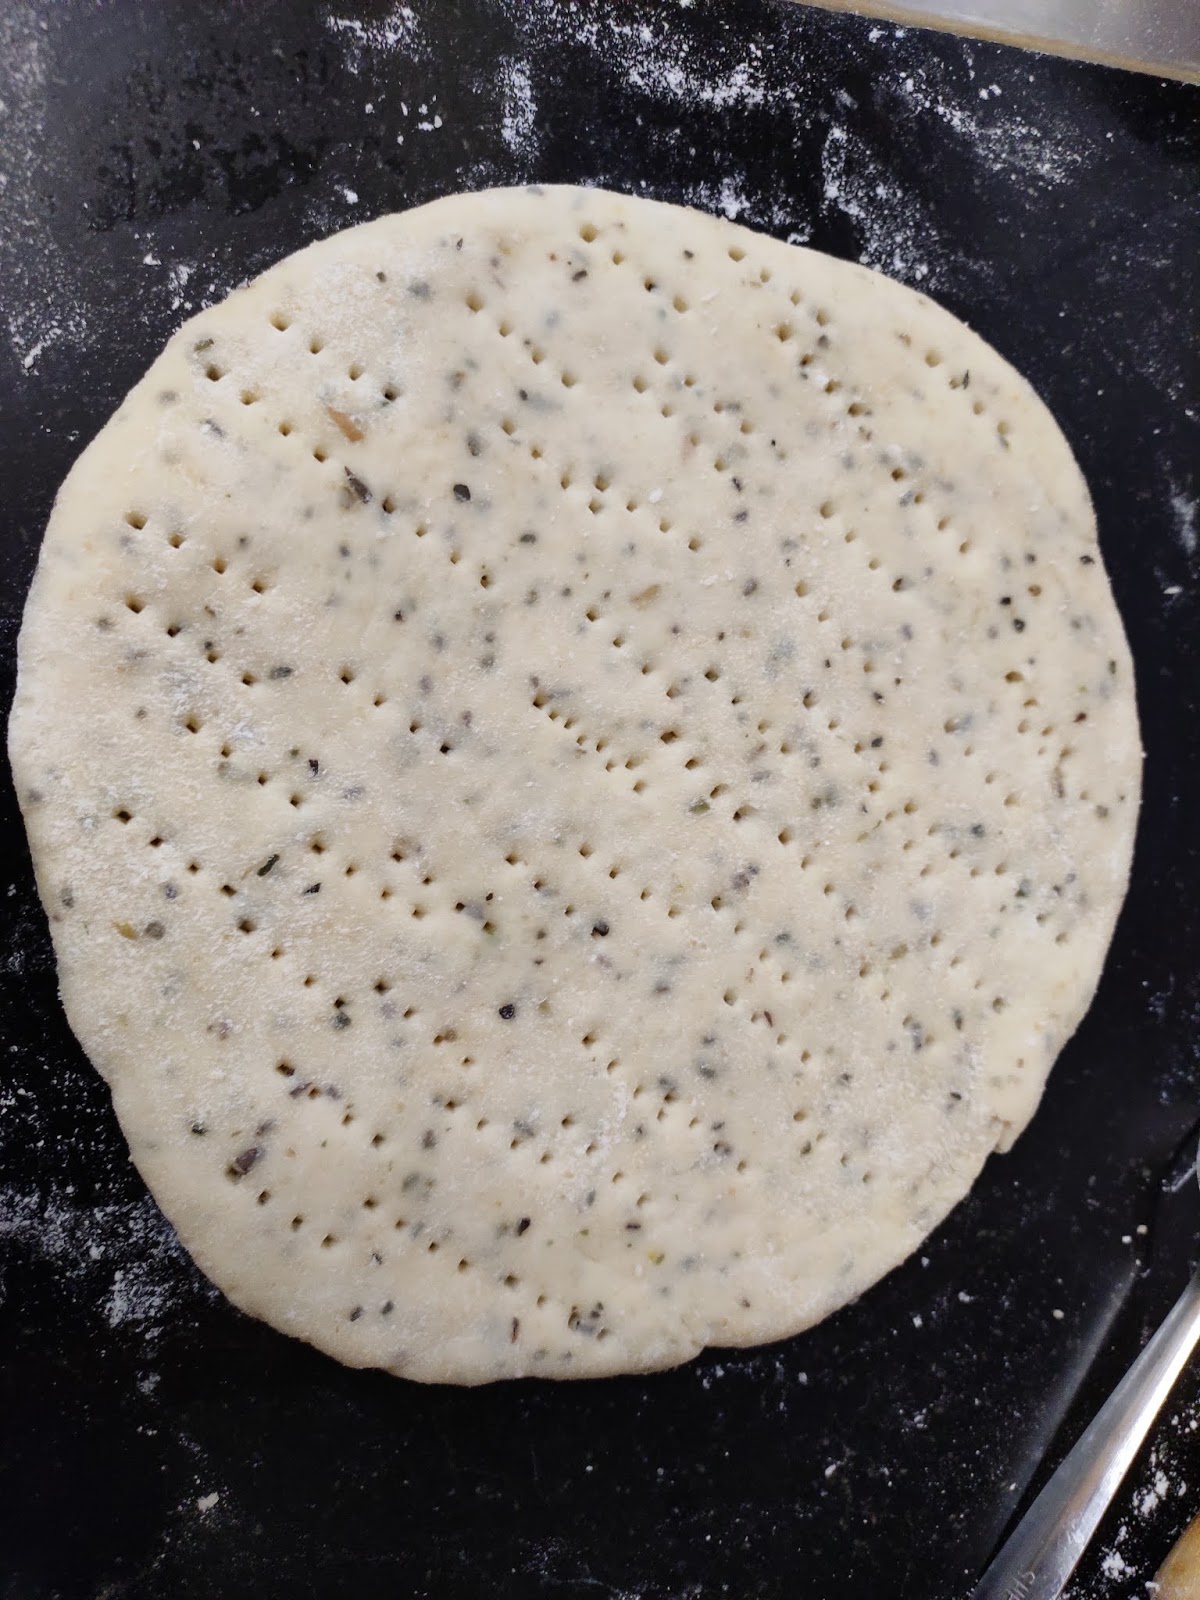
2. Roll it into a flat round shape as shown in the picture. I have not created a dent in my recipe, however you can create a dent so that it resembles of Restaurant Pizza. Prick the pizza base with forks as shown below. This helps the base to be cooked uniformly and inside as the steam is circulated through the holes.


3. Place the pizza base on a non stick pan. I made a mistake of using a cast iron pan and the base got slightly hard. However, non stick gives a perfect finish.


Base made by cooking on a non stick pan

4. After placing the base on non stick pan, apply pizza sauce generously.


5. Add all your favorite toppings uniformly. I have just added it randomly as it was just me and my husband who are gonna eat it:P This was a tip from my friend, ensure all 4 slices have all the toppings distributed equally so that everybody gets a bite of all the toppings. So start placing the toppings equally and uniformly so that when you cut them into 4 slices, it is divided equally and NOT like this one:)


6. Add lavish amount of mozzarella cheese cubes (grated or cubed) over the pizza along with some oregano, Italian herbs and red chili flakes sprinkled as per taste. Sooooo Cheeesy!!! and cover it with a lid. Allow the pan to simmer (full low flame) for 8 mins.


7. After 8 mins, remove the pizza from the pan and transfer to plate :):) Slice it and enjoy this simple Pan to Plate Pizza that is yummy and Cheesyyyyy !!!

8. You can also pre - cook the base alone as mentioned in the above step. Do not flip it. Cook by covering the lid on one side on low flame for 8 mins. After it cools down, store in Zip lock covers.

9. Add the pizza sauce, toppings,cheese and microwave it until the cheese melts. Serve it hot :) So Easy :)

Pre Cooking the base in advance


Friday, 24 July 2020

Homemade Pizza and Pasta Sauce (GB Special)

Why would one go for a store bought Pizza and Pasta sauce when the same can be made so easily at home with available ingredients?? The store bought pizza sauce have high amount of preservatives added that it almost kills the natural taste and flavor of the sauce. Ever since I started making these at home, there is no turning back. In case you do not have access to fresh bail or parsley leaves,you can very well use the dried ones that are readily available in the market. This can be stored in refrigerator for about a week. This can also be used as a dip for sandwich, breads and buns and trust me, it tastes amazing. Let's jump to the recipe.


Serves: 1 bowl

Ingredients

  1. Bangalore Tomatoes - 6
  2. Garlic Cloves Big - 8 ( alternatively you can use 4 tsp of garlic powder)
  3. Jalapenos - 5 slices ( for flavor and spice, however this is completely optional and you can skip if you don't have)
  4. Red Chilies - 3
  5. Kashmiri Red Chili Powder - 2 tsp (for nice color)
  6. Butter - 2 tbsp
  7. Olive Oil - 1 tbsp
  8. Tomato Sauce - 1 tbsp
  9. Sugar - 3/4 tsp
  10. Dried Parsley - 1 tsp
  11. Mixed Italian Herbs - 1 tsp (Dried Sage,Thyme,Rosemary,Marjoram)
  12. Dried Basil Leaves - 2 tsp
  13. Dried Oregano - 1 tsp
  14. Needed salt to taste


Method

1. Blanch the tomatoes as mentioned here.


2. Spread the blanched tomatoes on a tray for them to cool down. Remove the seeds and roughly chop the tomatoes.


3. Grind the jalapenos, garlic and red chilies together in a grinder to form a puree.


4. Heat butter in a pan and add some Olive oil. Add the pureed mixture and saute it on a low flame.


5. Add all the seasoning powders,kashmiri chili powder,sugar and salt. Slow cooking is very important for this sauce as only then the flavors will be released and retained. 


6. Simmer it on a low flame with pan covered for about 7-8 mins.

7. Add a tbsp of tomato sauce for the right tangy flavor.

8. Steam a glass jar to get rid of any germs or bacteria by immersing the glass jar in a boiling water completely along with the lid carefully using tongs.

9. Transfer the sauce to the glass jar and store it for about a week in refrigerator.

10. You can use this for pizza, pasta, dips, salad dressing. It tastes yummy!!!!!

Monday, 20 January 2020

Srilankan Yellow Rice (Kaha Bath)

I learnt this flavourful recipe from my baking teacher - Shyamala Mam who is a sri lankan settled here. She is an amazing cook and a home baker with a rich experience of over 36 years. It was so nice of her to share this authentic sri lankan recipe with me. You can find the original recipe posted on her Page. Any day, Rice has always been my favorite main course and I you can find a lot of rice varieties on my page.

This is a non spicy yet flavourful, aromatic rice cooked with coconut milk and butter and garnished with loads of kaju and kishmish. Coconut milk has been a very important ingredient in all of the sri lankan cuisine recipes. I have always found a similarity in the cuisines of all coastal regions - be it Goa, Kerala or Sri Lanka- Coconut Milk is just inevitable. :):)

The original recipe uses Pandan Leaf which is grown in Sri Lanka. However, I don't think one can get it here in India and hence I have skipped it. Any spicy accompaniment from GB'S Gravy Bowl goes well with mild aromatic Rice. The Golden Color of the rice comes from our Golden Spice - Turmeric :) You can wither use samba or Basmati Rice. I have used Basmati Rice for the preparation. Curry leaf is another important ingredient in this recipe. In the picture, I have added it in the start itself. I suggest you to add the curry leaves during garnishing so that the flavour is fresh and the curry leaf is crisp.


Let's now jump to the recipe.


Ingredients

  1. Basmati Rice/Samba Rice - 1.5 cups
  2. Coconut Milk(Thick) - 1.5 cups
  3. Water - 1.5 cups
  4. Ceylon Cinnamon - 1 inch Piece
  5. Bay Leaf - 2
  6. Cardamom-2
  7. Cloves-2
  8. Onions - 2 medium (thinly sliced)
  9. Butter - 2 tbsp
  10. Garlic Pods - 4 (chopped)
  11. Turmeric - 1/2 tsp
  12. Salt to taste

Garnishing

  1. Butter - 1.5 tbsp
  2. Cashews - 2 tbsp
  3. Raisins - 2 tbsp
  4. Curry Leaves - 10

Method

1. Wash nicely and soak the basmati Rice for about 20 mins.

2. In a pan, add butter, cinnamon, cardamom,cloves.bay leaf, garlic. Saute well.

3. Add Onions and saute until brown.

4. Add coconut milk, water, salt and turmeric and bring it to boil.

5. Add the basmati rice,mix well, cover the pan and simmer until the rice is done.

6. In a separate pan, add butter and roast cashews, raisins and curry leaves until crisp and golden brown.

7. Garnish the rice well and serve hot with your favourite accompaniment.


Tuesday, 12 November 2019

Homemade Granola using Jaggery

When it comes to toddler snacks, we always want to go in for a healthy option that are delectable for kids as well. Granola- is one such ideal healthy snacking option not just for kids, but adults as well.
Though not an Indian snack, it is off late gaining lot of popularity here for its healthy and nutritious contents.

This is a no bake recipe that can be so easily made on a stove top. This makes a great travel friendly snacking option for kids. My son loves this as he finds it crispy, crunchy and sweet :):)

You can make N number of combinations and varieties of Granola using the below key ingredients.

Preparation of Granola involves 5 Key ingredients
  1. Whole grains - Rice crisps, Whole Wheat grains, Rolled Oats, Corn Flakes
  2. Nuts - Walnut, Almonds, Pecan, Hazelnuts,Cashew Nuts
  3. Seeds - Sesame, Pumpkin, Melon, Flaxseeds, Chia Seeds
  4. Dry Fruits - Dried Cranberries, Blueberries, Raisins, chopped dates, dried apricots, dried strawberries
  5. Natural Sweeteners - Dates Syrup, Raw Honey, Maple Syrup,Cane Sugar, Brown unrefined sugar, unsweetened chocolate syrup
You can make this as a Trail mix or as bars. I have chose to make them as a crispy crunch mix. Let's jump to the preparation. :)


Serves: 2 Cups

Ingredients


Whole Grains


  • Rolled Oats - 1 cup

Seeds

  • Melon Seeds - 2 tbsp
  • Pumpkin Seeds - 2 tbsp

Seeds - Melon and Pumpkin Seeds


Nuts

  • Cashew Nuts - 2 tbsp
  • Walnuts - 2 tbsp

Nuts - Walnuts and Cashew Nuts


Dry Fruits

  • Raisins - 2 tbsp
  • Cranberries - 2 tbsp

Dry Fruits - Raisins and Cranberries


Sweeteners

  • Honey - 2 tbsp
  • Powdered Jaggery - 1/4 cup

Flavoring Ingredients

  • Vanilla Essence - 1 tsp
  • Cinnamon Powder - 1/2 tsp


Nuts,Seeds and Dry Fruits


Method

1. Dry Roast the seeds and nuts separately in a thick bottomed pan until they emit nice flavour. Keep it aside after roasting.

2. Dry Roast the oats in a thick bottomed pan on a low-medium flame until you start getting nice aroma of oats and keep it aside separately.

3. In the pan, add powdered jaggery, cinnamon powder and 2 tbsp of water to melt the jaggery. Ensure you melt it on full low flame.

4. Once the jaggery has melted, add all the dry roasted ingredients along with dry fruits and give it a nice mix.

5. To above, add Honey and vanilla essence and give it a nice stirring on low-medium flame so that all the ingredients are crunchy and crispy.

6. Remove the contents from the pan and transfer it to a large bowl.

7. Use both your hands to separate the contents from sticking to each other. Initially, it would be sticking to each other due to jaggery. However, as you keep repeating this process of separating them using your hands by breaking the lumps, it is easier for you to make crispy crunch Trail Mix.


Please note : Do it as soon as you remove the contents from pan. If you delay, it would be a little hard to break the lumps without breaking it.


8. Store it in an airtight container and it stays fresh for long :) Enjoy this delicious snacking.


Thursday, 7 June 2018

Authentic Greek Salad - Horiatiki Salad

Greek Salad is a popular salad recipe across globe. Its origin is from Greece. However, the ones you find in other regions of the world are not really an authentic version but rather an enhanced or substituted versions of Greek Salad which uses leafy greens,potatoes and other dressings. An authentic Greek Salad or Horiatiki salad (means from village) uses main limited ingredients which are Fresh Organic Ripe Tomatoes, Fresh Cucumbers,Green Bell Pepper,Red Onions,Kalamata Olives, some Extra Virgin Olive Oil,Solid Greek Feta Cheese and Dried Oregano.

This salad is very similar to Bulgarian Shopska Salad . Both have Tomatoes,cucumbers and Onions in common. Major difference is the feta cheese that is used for dressing. Bulgarian feta cheese is produced using sheep's or goat's milk with a special yogurt culture or bacteria that was found in Bulgaria. However, Greek Feta Cheese is produced in the Greek regions and claims to be different from Bulgarian white cheese,Sirene. I am not really sure how both vary with respect to texture and taste. I am yet to taste a Greek feta cheese to understand the difference.However, in this recipe I have used Bulgarian feta cheese and not Greek feta cheese. Another difference is the use of Kalamata Olives in Greek salad which is not used in Bulgarian Shopska Salad .

Kalamata Olives are the ones that are dark purple or black in color.They are native to Greece and is used in whole form for this salad. However, I could not get hold of them and hence I have used pitted green olives. If you are able to get canned or fresh Kalamata whole black olives, you are proceeding very authentically:)

Let's look into the preparation of this popular authentic salad.


Serves:3

Ingredients

  1. Bangalore Tomatoes - 3 Medium sized 
  2. Red Onion - 1 Big
  3. Green Capsicum/Bell Pepper - 1 medium
  4. Cucumber - 1 big or 2 small
  5. Kalamata Olives / any available Olives - 8 - 10 (whole ones)
  6. Feta Cheese - A big slice / 100gms
  7. Extra Virgin Olive Oil - 5 tbsp
  8. Dried Oregano - 2 tsp or more as per taste
  9. Red Wine Vinegar - 1 tbsp
  10. Needed salt


Method

1. Wash and chop all the vegetables mentioned. You can cut them into desired shape, either disc shaped or cubes. Whichever way you like it to be.

2. Mix all the vegetables and toss it gently with oregano,needed salt,vinegar and olive oil.

3. Place a big slice of feta cheese and drizzle some Olive oil on top.

4. Season with some oregano and serve fresh with breads or buns :):)


Notes,Tips & Add-on's

  1. A very important thing for this salad is, the ingredients and vegetables that are used should be really fresh, preferably organic as that gives the right taste and color to this salad.
  2. Ensure the cucumber and Olives do not taste bitter, else it might spoil the taste of the salad.
  3. I have used crumbled sirene(Bulgarian feta cheese here), however to ensure authenticity, use a big slice of Greek feta cheese and not the crumbled ones.
  4. Original recipe uses whole black Kalamata olives. I have substituted with green pitted olives as I was not able to get hold of Kalamata olives from nearby shop.


Saturday, 2 June 2018

Tarator (Таратор)

Tarator - Bulgarian Cold cucumber soup is a traditional and popular recipe from the Balkan regions. It is mainly prepared during summer with cucumber and yogurt as the main ingredient. The consistency can vary depending on how thick or thin you want. This is generally served cold and served in traditional Bulgarian Clay Pot, Gyuveche. Let's look into this preparation.


Serves:2-3


Ingredients

  1. Cucumber - 2 small sized or 1 big
  2. Whisked thick curd/yogurt - 1 cup
  3. Water as needed depending on consistency 
  4. Garlic cloves - 3-4 (crushed or chopped finely)
  5. Walnuts - 2 tbsp (chopped finely) 
  6. Olive Oil/Sunflower oil - 2 tbsp
  7. Salt as needed 
  8. Fresh coriander leaves/dill/parsley for garnishing as needed 

Method

1. Peel and chop the the cucumbers into fine small cubes.

2. Mix garlic, yogurt and cucumber with needed salt.

3. Add water if you require a thin consistency. Adjust the water depending on how thick or thin you want the soup.

4. Drizzle some olive/sunflower oil and mix gently.

5. Garnish with fresh coriander leaves/dill,chopped walnuts and serve the soup chilled.

Notes,Tips & Add-On's

  1. Original recipe uses dill. I have substituted with fresh coriander leaves as I don't get dill here.
  2. You can either refrigerate the soup overnight or add ice cubes to serve them chilled. Either way it tastes great.


Monday, 28 May 2018

Shopska Salata (Шопска салата)

My husband had to visit bulgaria for an official purpose and that's when I tried googling about Bulgaria, its tradition, culture and cuisine. I was surprised to know that Bulgarian food culture holds strong roots to ancient cooking using fresh vegetables. Their traditional recipes are highly healthy and vegetarian. I thought I must try them right away and hence asked my husband to purchase the signature items of bulgaria to try the bulgarian cuisine right here at home.


Shopska Salata or Shopska salad is a traditional summer salad which is popular among the balkan regions like Bulgaria,Macedonia and Serbia. The main ingredients are Tomatoes,Cucumbers and Bulgarian White Feta Cheese. These colors Red,Green and white represent the bulgarian national flag. Interesting ins't it:)

The Bulgarian white feta cheese, also known as sirene is very famous and native to bulgaria made from sheep's milk and a special bacteria that is found exclusively in bulgaria. The texture is very soft and crumbles easily when touched. It is not hard as the processed cheese that we get here in India. It is slightly salty and has a fresh creamy aroma.I loved eating it plain and it tasted too good and yummy :):)!!!! It is very similar to greek feta cheese. Bulgarians use it as an accompaniment to almost all their dishes and also have it in fried form.

The salad is served in a special Bulgarian clay pot called ,Gyuveche. Yes, I asked my husband to get these from Bulgaria. This is a must buy souvenir if you are visiting Bulgaria. :):)

Bulgarians use Sunflower oil in their cooking and as for the vinegar, it is Grape Vinegar. Since, I could not get hold of grape vinegar, I have used Balsamic Vinegar which is close enough substitute in my opinion because both Balsamic and Grape Vinegar use Grape Must as their major ingredient. However, the difference between traditional balsamic vinegar and Grape Vinegar is the way the grape must is prepared.

Let's see how to prepare this easy refreshing salad.


Serves: 2

Ingredients

  1. Banglore Tomato - 1 big (chopped finely)
  2. Cucumber - 1 (peeled and chopped)
  3.  Bulgarian white feta cheese - 1/4 cup
  4. Onion(Red/White) - 1 big or 2 small 
  5. Red/Green/Yellow Bell pepper - 1 small or 1/2 big ( chopped)
  6. Olive Oil/Sunflower oil - 3 tbsp
  7. Red Wine Vinegar/Balsamic Vinegar/White Vinegar - 1 tbsp
  8. Fresh Parsley/Cilantro - for garnishing
  9. Salt and pepper as needed


Method

1. Mix tomato, cucumber, onions and chopped bell peppers in a large mixing bowl.

2. Add needed salt and pepper,Oil and balsamic vinegar and gently toss the salad.

3. Top it with freshly crimbled bulgarian white feta cheese.

4. Garnish with cilantro/parsley and the summer refreshing salad is ready:):)!!!!


Notes,Tips & Add-on's

  1. I have used extra virgin olive oil for this recipe as I like to use it personally for raw salad.However, if you want to maintain authenticity for the recipe, use sunflower oil.
  2. You can add any vegetables to make this salad, but main ingredients are tomatoes,cucumbers and cheese.
  3. Use any fresh cheese if Bulgarian white feta cheese is not available.
  4. You can also substitute lemon juice instead of vinegar and it tastes great equally.
  5. I have used cilantro as I didn't get fresh parsley here. Originally, Parsley is used for this recipe.


Monday, 23 April 2018

Pasta Primavera

Pasta Primavera, is probably one of the most healthiest version of Pasta.There is no separate sauce required for making this pasta.It is a combination of fresh vegetables sauteed with minced garlic and Olive Oil.It is very simple and easy to make.Traditionally, Parmesan cheese is added to it as a final topping. I have skipped adding cheese as I wanted to keep it vegan and healthy. Also, I have added balsamic vinegar for additional flavor and taste. 
The taste and flavor to this pasta comes from the fusion of fresh roasted vegetables in herbed olive oil and garlic with balsamic vinegar .

Indulge in this sin free healthilicious Italian Treat.


Serves : 2-3

Ingredients

  1. Extra Virgin Olive Oil/ normal edible Olive Oil - 1/4 cup
  2. Durum Wheat Pasta - 1.5 cups  
  3. Balsamic Vinegar - 1 tbsp 
  4. Mixed Italian seasoning - 2 tsp or more depending on taste
  5. Garlic - 4 pods (minced finely)
  6. Salt and Pepper to taste

Vegetables

  • Broccoli - 6-7 florets
  • Red Bell Pepper - 1 small (cut into julienne)
  • Yellow Bell Pepper - 1 small (cut into julienne)
  • Baby corn - 4 (slit length wise)
  • Onion - 1 small (cut lengthwise)
  • Tomato - 1 large or 2 small (chopped finely)
  • American sweet corn- 2 tbsp


Method

1. Boil broccoli and baby corn for about 2 mins with tsp of salt. Strain them and keep it aside. Cook Pasta till Al Dente and keep aside.

2. Take a pan, add olive oil. Add some minced garlic and onion and saute till nice aroma and onions turn translucent on a medium flame.

3. Add all the veggies (other than broccoli and baby corn) and saute for 2 mins with some salt, pepper and mixed herb seasoning. Ensure the flame low-medium and not high.

4. Now add broccoli and baby corn and cook for 5 more mins. Ensure that all the veggies are nicely cooked and covered in herb flavored Olive oil and garlic.

5. Now add the cooked pasta and saute well. Drizzle the balsamic vinegar and toss well so that the pasta is covered uniformly blended well with the aromatic flavored vegetables.

6. Drizzle some more olive oil and serve it piping hot with slice of bread or Soups.


Notes,Tips & Add-on's

  1. You can add any veggies of your choice and any number of vegetables. Absolutely left to your convenience.
  2. You can add some grated Parmesan or any other cheese on top before serving.
Related Posts Plugin for WordPress, Blogger...


Tuesday, 17 April 2018

Lebanese Falafel Wrap

Lebanese falafel wrap - as the name suggests, is a very popular dish in the Lebanese or Mediterranean cuisine. Traditionally it is made using Pita bread or Pita pockets. I have here used ready made tortilla wraps to make the base. This was first introduced to me by my best friend. She is definitely a pro in making these wraps with ease. Though I had tasted this already at a restaurant called New Yorker, I was not very much fond of this. She had once made it on an occasion for dinner. It tasted so so delicious that I instantly fell in love with it. This tasted way too good compared to restaurant which served them and it was pricey too. This is a recipe that is shared by her and I tried this at home for my husband. I was really happy with the way it had turned out. Here, I am sharing this special recipe that was passed on to me by my friend. Enjoy this International cuisine made easily at home in a less expensive way :):) Once the ingredients like falafel, tahini and veggies are ready, the falafel wrap is very easy to make and is just assembling work.


Ingredients

  1. Tortilla Wraps - 6 
  2. Red Chili Sauce - 2 tbsp per wrap or more as per taste 
  3. Tahini Sauce - 3 tbsp per wrap or more as per taste
  4. Falafel - 3 per wrap
  5. Aluminium Foil for wrapping

Vegetables

  • Lettuce or Cabbage (shredded) - 1/2 cabbage 
  • Onion - 1 Large (cut as shown in the pic) 
  • Carrot- 2 big (cut into julienne as shown in the pic) 
  • Tomato - 3 large (halved and cut lengthwise)


Method

1. Heat the tortilla wrap either with little olive oil or butter on a pan until brown spots appear.

2. Apply some red chili sauce on the tortilla base.

3. Assemble all the veggies on the top - middle portion of the wrap, spare some space in the bottom and both sides of the wrap as we need to fold them on the sides and bottom so that it becomes spill proof.

4. Drizzle generous tahini sauce and chili sauce on the veggies. Place 3 falafel over the veggies.

5. Fold the left and right side of the wrap and then fold the bottom of the wrap upwards so the the contents are secured inside the wrap.

6. Use a aluminium foil to secure the wrap tight as shown in the picture.

7. Serve the wraps fresh along with Tahini Sauce or any sauce of your choice :):)!!!!


Notes,Tips & Add-on's

  1. If you are unable to get hold of tortilla wraps, you can make a wrap base using All purpose flour. It comes out really soft and tastes even good.
  2. Veggies can be anything of your choice :)

Falafel

Falafel, is deep fried balls made from chickpeas and is a popular dish in Mediterranean / Lebanese cuisine. It is said to have originated from Middle East. It can be either eaten alone with hummus or Tahini Dip or can be made as a Falafel Wrap using tortilla or pita bread. This is absolutely delicious and healthy. 


Ingredients

  1. Chickpeas soaked overnight - 250 gms or 1 Cup 
  2. Onion - 1 Large (roughly chopped) 
  3. Garlic - 4 pods 
  4. Coriander leaf/cilantro - 1/2 bunch 
  5. Parsley - 2 tbsp finely chopped (Optional) 
  6. Cumin seeds - 1 tsp 
  7. Salt as needed 
  8. Red chili powder - 1 tsp or more as per the taste 
  9. Cornflour - 3 - 4 tbsp for binding 
  10. Oil for deep frying


Method

1. Pulse the soaked chickpea along with other ingredients mentioned into a coarse mixture as shown in the picture above.

2. Form equal sized balls from the coarse mixture and deep fry them in hot oil until they are golden brown.

3. Serve hot yummy falafel with Tahini Dip or any other sauce.

Notes,Tips & Add-on's

  1. The falafel shape can be either rolled out to balls or can be flattened. Depends on your wish.
  2. I have used cornflour for binding as it adds crispiness to the balls. You can also use All purpose flour/Maida.