Tuesday, 4 February 2020

Lehsuni Green Moong Tadka

Another healthy and protein packed side dish that goes well with both rice and Rotis. This is very simple and easy to make at one shot in a cooker. I prepare this quite often when am bored with the traditional yellow toor dhal. This also appeases your hunger and makes u feel full for long time. This in turn helps you from over eating and restricting you to eat healthy and in correct quantity.

This is a tadka dish, where spicy garlic and red chili sauteed in Ghee is tempered for the final presentation and taste. You can skip this step if in case you want a less spicy dish in order to make it kids friendly.


Serves: 2

Ingredients

  1. Whole Green Gram - 3/4 cup
  2. Water - 1.5 cups
  3. Tomatoes - 2 (chopped)
  4. Onions - 1 big (chopped)
  5. Cumin - 1 tsp
  6. Ginger Garlic Paste - 1 tsp
  7. Garam Masala - 1/2 tsp
  8. Coriander powder - 3/4 tsp
  9. Jeera - 1 tsp
  10. Oil - 2 tsp
  11. Turmeric - 1/4 tsp
  12. Crushed Kasuri Methi - 1 tsp
  13. Needed Salt

Tadka Tempering

  1. Ghee - 1 tbsp
  2. Red Chili Powder - 1/2 tsp
  3. Garam Masala - 1/2 tsp
  4. Garlic Pods - 6 (chopped as shown in pic)
  5. Red Chili - 2


Method

1. Soak Green gram in water for minimum of 4 hours. After soaking, drain the water.

2. Take a pressure pan, add oil and cumin. Once the cumin splutters, add onion and saute well until onion turns transparent.

3. Now add tomatoes and give it a nice mix until it gets mushy. Add ginger garlic paste and saute for a min.

4. Add the soaked and drained green gram, water, salt and all the powders.


5. Pressure cook the contents for 4 whistles 
on a low medium flame and then switch off .

6. Open the pressure cooker, add crushed kasuri methi and give a nice mix to the well cooked green gram.

7. In a frying pan, heat ghee.Add some chili powder and garam masala.Add chopped garlic, red chili and fry until garlic turns light golden brown.

8. Now add the tadka tempering to the the cooked dal.

9. Serve hot with chapati or Steamed Rice, Pulao anything of your choice.


Wednesday, 22 January 2020

Vegetable Moong Dal Fry

One of the easiest and healthiest side dish that can be made in a jiffy. This can also be given to kids if you reduce the amount of spice being added as this is full of proteins.
You can have this for both rice as well as Roti/Chapati and Naan. This is OPOS - One pot one shot cooking and hence it is really easy and convenient for me to make this after I return from office. This has goodness of all vegetables as well:) I often make this at home when I am in loss of time or feel extremely bored.

Let's quickly jump into the recipe.


Serves: 4 - 5

Ingredients

  1. Moong Dal - 1.5 cups
  2. Water - 3 cups
  3. Turmeric - 1/2 tsp
  4. Green Chili - 1
  5. Ginger garlic paste - 2 tsp
  6. Garam Masala - 1 tsp
  7. Coriander Powder - 1 tsp
  8. Red Chili Powder - 1 tsp
  9. Cumin Seeds - 2 tsp
  10. Ghee/Oil - 1 tbsp
  11. Bay Leaf - 1
  12. Kasuri Methi - 1 tsp
  13. Coriander leaves for garnishing

Vegetables - Anything of your choice

  • Cauliflower florets - 5
  • Carrot - 1 (chopped)
  • Capsicum - 1/2 (Chopped)
  • Baby corn - 4 (round)
  • Tomato - 2 Big (chopped)
  • Onion - 1 Big

Method

1. Take a cooker, add ghee and jeera. Once the cumin seeds splutter, add onions, chili and Bay leaf. Saute well until onions turns translucent.


2. Add ginger garlic paste and saute for about a min.

3. Add all other veggies along with all the "powders".


4. Add moong dal and water along with salt.


5. Stir the contents well and pressure cook for about 4 whistles.

6. Let the pressure settle on its own. Open the cooker. Add some crushed kasuri methi leaves.

7. Give a Nice mix. If required, adjust water and salt according to the consistency needed.


8. Serve hot garnished with coriander and tasty Veg Dal Fry is ready in a jiffy. :)


Monday, 20 January 2020

Srilankan Yellow Rice (Kaha Bath)

I learnt this flavourful recipe from my baking teacher - Shyamala Mam who is a sri lankan settled here. She is an amazing cook and a home baker with a rich experience of over 36 years. It was so nice of her to share this authentic sri lankan recipe with me. You can find the original recipe posted on her Page. Any day, Rice has always been my favorite main course and I you can find a lot of rice varieties on my page.

This is a non spicy yet flavourful, aromatic rice cooked with coconut milk and butter and garnished with loads of kaju and kishmish. Coconut milk has been a very important ingredient in all of the sri lankan cuisine recipes. I have always found a similarity in the cuisines of all coastal regions - be it Goa, Kerala or Sri Lanka- Coconut Milk is just inevitable. :):)

The original recipe uses Pandan Leaf which is grown in Sri Lanka. However, I don't think one can get it here in India and hence I have skipped it. Any spicy accompaniment from GB'S Gravy Bowl goes well with mild aromatic Rice. The Golden Color of the rice comes from our Golden Spice - Turmeric :) You can wither use samba or Basmati Rice. I have used Basmati Rice for the preparation. Curry leaf is another important ingredient in this recipe. In the picture, I have added it in the start itself. I suggest you to add the curry leaves during garnishing so that the flavour is fresh and the curry leaf is crisp.


Let's now jump to the recipe.


Ingredients

  1. Basmati Rice/Samba Rice - 1.5 cups
  2. Coconut Milk(Thick) - 1.5 cups
  3. Water - 1.5 cups
  4. Ceylon Cinnamon - 1 inch Piece
  5. Bay Leaf - 2
  6. Cardamom-2
  7. Cloves-2
  8. Onions - 2 medium (thinly sliced)
  9. Butter - 2 tbsp
  10. Garlic Pods - 4 (chopped)
  11. Turmeric - 1/2 tsp
  12. Salt to taste

Garnishing

  1. Butter - 1.5 tbsp
  2. Cashews - 2 tbsp
  3. Raisins - 2 tbsp
  4. Curry Leaves - 10

Method

1. Wash nicely and soak the basmati Rice for about 20 mins.

2. In a pan, add butter, cinnamon, cardamom,cloves.bay leaf, garlic. Saute well.

3. Add Onions and saute until brown.

4. Add coconut milk, water, salt and turmeric and bring it to boil.

5. Add the basmati rice,mix well, cover the pan and simmer until the rice is done.

6. In a separate pan, add butter and roast cashews, raisins and curry leaves until crisp and golden brown.

7. Garnish the rice well and serve hot with your favourite accompaniment.


Tuesday, 12 November 2019

Homemade Granola using Jaggery

When it comes to toddler snacks, we always want to go in for a healthy option that are delectable for kids as well. Granola- is one such ideal healthy snacking option not just for kids, but adults as well.
Though not an Indian snack, it is off late gaining lot of popularity here for its healthy and nutritious contents.

This is a no bake recipe that can be so easily made on a stove top. This makes a great travel friendly snacking option for kids. My son loves this as he finds it crispy, crunchy and sweet :):)

You can make N number of combinations and varieties of Granola using the below key ingredients.

Preparation of Granola involves 5 Key ingredients
  1. Whole grains - Rice crisps, Whole Wheat grains, Rolled Oats, Corn Flakes
  2. Nuts - Walnut, Almonds, Pecan, Hazelnuts,Cashew Nuts
  3. Seeds - Sesame, Pumpkin, Melon, Flaxseeds, Chia Seeds
  4. Dry Fruits - Dried Cranberries, Blueberries, Raisins, chopped dates, dried apricots, dried strawberries
  5. Natural Sweeteners - Dates Syrup, Raw Honey, Maple Syrup,Cane Sugar, Brown unrefined sugar, unsweetened chocolate syrup
You can make this as a Trail mix or as bars. I have chose to make them as a crispy crunch mix. Let's jump to the preparation. :)


Serves: 2 Cups

Ingredients


Whole Grains


  • Rolled Oats - 1 cup

Seeds

  • Melon Seeds - 2 tbsp
  • Pumpkin Seeds - 2 tbsp

Seeds - Melon and Pumpkin Seeds


Nuts

  • Cashew Nuts - 2 tbsp
  • Walnuts - 2 tbsp

Nuts - Walnuts and Cashew Nuts


Dry Fruits

  • Raisins - 2 tbsp
  • Cranberries - 2 tbsp

Dry Fruits - Raisins and Cranberries


Sweeteners

  • Honey - 2 tbsp
  • Powdered Jaggery - 1/4 cup

Flavoring Ingredients

  • Vanilla Essence - 1 tsp
  • Cinnamon Powder - 1/2 tsp


Nuts,Seeds and Dry Fruits


Method

1. Dry Roast the seeds and nuts separately in a thick bottomed pan until they emit nice flavour. Keep it aside after roasting.

2. Dry Roast the oats in a thick bottomed pan on a low-medium flame until you start getting nice aroma of oats and keep it aside separately.

3. In the pan, add powdered jaggery, cinnamon powder and 2 tbsp of water to melt the jaggery. Ensure you melt it on full low flame.

4. Once the jaggery has melted, add all the dry roasted ingredients along with dry fruits and give it a nice mix.

5. To above, add Honey and vanilla essence and give it a nice stirring on low-medium flame so that all the ingredients are crunchy and crispy.

6. Remove the contents from the pan and transfer it to a large bowl.

7. Use both your hands to separate the contents from sticking to each other. Initially, it would be sticking to each other due to jaggery. However, as you keep repeating this process of separating them using your hands by breaking the lumps, it is easier for you to make crispy crunch Trail Mix.


Please note : Do it as soon as you remove the contents from pan. If you delay, it would be a little hard to break the lumps without breaking it.


8. Store it in an airtight container and it stays fresh for long :) Enjoy this delicious snacking.


Monday, 11 November 2019

Eggless Whole Wheat Almond Muffins using Flax Meal

As our kids enter toddlerhood, a major pressure or rather confusion befall on us 
(parents) - what healthy snacks can I give my child? 

My son brings back almost half of the snacks that I send him for school. However, he loves cakes, sweets and biscuits which are quite unhealthy. I thought why not make them at home with healthy ingredients so that we can give them without any guilt or fear. This is one such recipe which uses the goodness of whole wheat, Almond flour, flaxseed and butter. This makes a healthy wholesome delicious snack for kids any day.

This is one of my son's favorite snacks. He says Yummy yummy and eat it. That feeling you get when you know your kid is enjoying what you cook for him is such a state of bliss :)

This recipe is an adaptation of SharmisPassions-WholeWheat Almond Muffins. I have replaced the egg in original recipe with flax egg.

                        1 egg = 1 tbsp Flaxseed Powder dissolved in 3 tbsp of water


Yields 9 cup cakes

Ingredients

Dry Ingredients

  1. Whole Wheat flour - 3/4 cup
  2. Almond Flour - 1/4 cup
  3. Baking Soda - 1/4 tsp
  4. Cane Sugar/Organic Jaggery - 1/2 cup
  5. Cinnamon Powder - 1/2 tsp (Optional)

Wet Ingredients

  1. Flax Egg - 1 tbsp Flaxseed Powder dissolved in 3 tbsp of water (rest for 15 mins)
  2. Boiled Milk - 1/2 cup
  3. Unsalted Butter - 1/4 cup
  4. Vanilla Essence - 1 tsp


Method

1. Sift all the dry ingredients in a large mixing bowl and mix well.

2. Now add all the wet ingredients and mix well using a hand mixer or Blender until the wet ingredients and dry ingredients are combined well.


Cupcake batter ready
                              
3. Line a cupcake liner inside silicon moulds. Alternatively, you can use a muffins tray if it would fit inside your oven.

4. Fill each of the mould upto half of the volume as the batter would rise during baking process.


Batter filled in the moulds
                                 
5. Once filled, decorate them with your choice of sugar sprinklers as shown in the pic.


6. Preheat the oven at 180 degrees celsius for 10 mins.

7. Place the cupcake tray inside the oven and bake for 30 mins at 180 degrees Celsius.

8. After 30 mins, remove the cup cake and allow it cool to room temperature.

9. Can be refrigerated in an airtight box for about a week.

10. Keep one daily for your toddler in his/her snack box and see them glee :)


Notes,Tips & Add-On's

  1. Each oven temperature and heating capacity is different. My oven cooks only after 30 mins. However, I request you to keep checking on the cup cakes every 10 mins.
  2. Gently press the top of the cake to see if it is firm, alternatively you can also use tooth pick to check if the cake is cooked in the center. The tooth pick has to come out clean.
Cup cake with icing done

Wednesday, 11 September 2019

Vegan Banana Bread

I have been googling a lot to find some healthy snack options for my kid which I can pack for him and send it to school. That is when I bumped on to this recipe. I am an amateur baker and still learning. I have had my bad day at baking where my cake has been either burnt or got hard or never raised. I am still figuring out the various reasons and nuances of baking and trying to fine tune the art of baking. This is a recipe picked from Veg Recipes of India and you can refer the recipe here.

I don't have an OTG and am using a normal convection mode Panasonic microwave oven. The cakes baked from OTG definitely looks more professional in terms of texture and color compared to convection oven cooking. Still, you can achieve a close enough texture and softness from convection oven by following proper tips, understanding your oven and setting the right temperature.

Baking to me has always been like a chemistry lab experiment, you add the right ingredients in right amount and there you have the final output :P:P I generally haven't had the courage to play around with ingredients due to the fear of they not turning out properly. In the picture, I have used granulated white sugar. But I suggest you to use unrefined brown sugar or cane sugar instead to make it a healthy option for kids.


This recipe turned out really well for me and my kid also loved it. I will share certain tips that I followed to prevent major mishaps while baking in order to get a smooth soft cake. Follow the exact steps and ingredient amounts to get it perfect. :)


Ingredients

  1. Whole Wheat flour - 3/4 cup
  2. All purpose flour - 3/4 cup
  3. 4 medium sized over ripe bananas
  4. Olive Oil - 1/3 cup
  5. Unrefined sugar/cane sugar - 3/4 cup
  6. Vanilla extract - 1 tsp
  7. Cinnamon Powder - 3/4 tsp
  8. Baking Powder - 1.5 tsp
  9. Baking Soda - 1/2 tsp


Method

1. Take a bowl and mash the banana and sugar together into a puree using hand blender or even mixer. I have used White sugar here, but pls substitute with unrefined brown/cane sugar for kids as its healthy.


2. Add  cinnamon powder and Vanilla extract to the puree for flavour enhancement.


3. Add olive oil. This provides the extra softness to the cake as this an eggless cake.


4. Sieve the flour (Maida+Whole Wheat Atta) and add it to the above wet ingredients.


5. Mix the batter using (Cut and Fold Method) to ensure the wet and dry ingredients are combined evenly. Do not over do it. Stop when both wet and dry ingredients have combined in right proportion.

6. Grease and dust a bread loaf pan with flour, transfer the bread batter to the pan. Tap twice and level it.


7. Preheat the oven at 180 degree Celsius for 10 mins. After the preheat temperature is set, cook the batter for 40 mins.

Tip 1: After first 20 mins of baking, cover the top of the pan with a wet cloth or wet butter paper. This is done to allow the centre of the batter to get cooked without burning the top. The centre takes long for getting cooked. Wet the cloth/paper every now and then and place it on the top to prevent burning through the entire baking process. The browning of top varies from oven to oven. So if you feel the browning of top happens quickly, then start covering the top much earlier.

Tip 2: After 40 mins, insert a toothpick in the middle of the bread and take it out. If it comes out clean, then the bread has been cooked well and you can remove it from oven.

If not, bake for another 10 more mins and repeat the toothpick step.


8. Allow the bread to cool down on its own completely and remove it from the loaf pan by inverting it.

9. You can store this cake in fridge in an airtight container for about 5 days. Warm the cake  before serving :):)


Monday, 5 August 2019

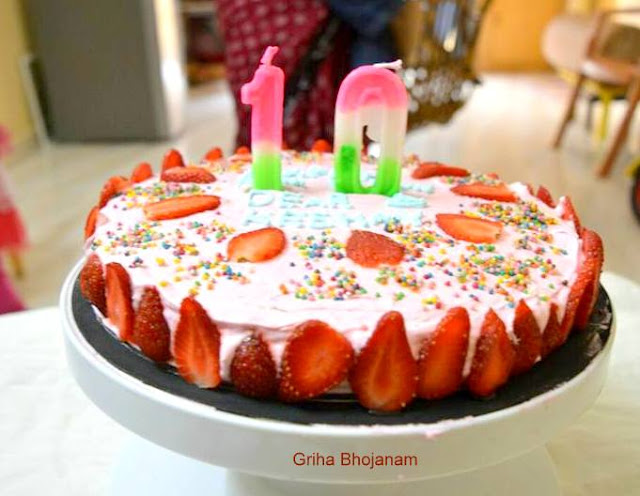
Real Strawberry Cake with Strawberry Icing

This indeed a very special and close to my heart cake. First time I tried attempting a strawberry cake with strawberry icing. This came out really well and very tasty too.  I made this cake for my elder nephew on his 10th birthday. It was a very small home bound celebration. This cake and the icing is made using fresh strawberries. The writing has been done with Blue color icing. I used blue food color and icing sugar to accomplish the same. This is a very humble attempt by me despite being a beginner in baking.