Tuesday, 12 November 2019

Homemade Granola using Jaggery

When it comes to toddler snacks, we always want to go in for a healthy option that are delectable for kids as well. Granola- is one such ideal healthy snacking option not just for kids, but adults as well.
Though not an Indian snack, it is off late gaining lot of popularity here for its healthy and nutritious contents.

This is a no bake recipe that can be so easily made on a stove top. This makes a great travel friendly snacking option for kids. My son loves this as he finds it crispy, crunchy and sweet :):)

You can make N number of combinations and varieties of Granola using the below key ingredients.

Preparation of Granola involves 5 Key ingredients
  1. Whole grains - Rice crisps, Whole Wheat grains, Rolled Oats, Corn Flakes
  2. Nuts - Walnut, Almonds, Pecan, Hazelnuts,Cashew Nuts
  3. Seeds - Sesame, Pumpkin, Melon, Flaxseeds, Chia Seeds
  4. Dry Fruits - Dried Cranberries, Blueberries, Raisins, chopped dates, dried apricots, dried strawberries
  5. Natural Sweeteners - Dates Syrup, Raw Honey, Maple Syrup,Cane Sugar, Brown unrefined sugar, unsweetened chocolate syrup
You can make this as a Trail mix or as bars. I have chose to make them as a crispy crunch mix. Let's jump to the preparation. :)


Serves: 2 Cups

Ingredients


Whole Grains


  • Rolled Oats - 1 cup

Seeds

  • Melon Seeds - 2 tbsp
  • Pumpkin Seeds - 2 tbsp

Seeds - Melon and Pumpkin Seeds


Nuts

  • Cashew Nuts - 2 tbsp
  • Walnuts - 2 tbsp

Nuts - Walnuts and Cashew Nuts


Dry Fruits

  • Raisins - 2 tbsp
  • Cranberries - 2 tbsp

Dry Fruits - Raisins and Cranberries


Sweeteners

  • Honey - 2 tbsp
  • Powdered Jaggery - 1/4 cup

Flavoring Ingredients

  • Vanilla Essence - 1 tsp
  • Cinnamon Powder - 1/2 tsp


Nuts,Seeds and Dry Fruits


Method

1. Dry Roast the seeds and nuts separately in a thick bottomed pan until they emit nice flavour. Keep it aside after roasting.

2. Dry Roast the oats in a thick bottomed pan on a low-medium flame until you start getting nice aroma of oats and keep it aside separately.

3. In the pan, add powdered jaggery, cinnamon powder and 2 tbsp of water to melt the jaggery. Ensure you melt it on full low flame.

4. Once the jaggery has melted, add all the dry roasted ingredients along with dry fruits and give it a nice mix.

5. To above, add Honey and vanilla essence and give it a nice stirring on low-medium flame so that all the ingredients are crunchy and crispy.

6. Remove the contents from the pan and transfer it to a large bowl.

7. Use both your hands to separate the contents from sticking to each other. Initially, it would be sticking to each other due to jaggery. However, as you keep repeating this process of separating them using your hands by breaking the lumps, it is easier for you to make crispy crunch Trail Mix.


Please note : Do it as soon as you remove the contents from pan. If you delay, it would be a little hard to break the lumps without breaking it.


8. Store it in an airtight container and it stays fresh for long :) Enjoy this delicious snacking.


Monday, 11 November 2019

Eggless Whole Wheat Almond Muffins using Flax Meal

As our kids enter toddlerhood, a major pressure or rather confusion befall on us 
(parents) - what healthy snacks can I give my child? 

My son brings back almost half of the snacks that I send him for school. However, he loves cakes, sweets and biscuits which are quite unhealthy. I thought why not make them at home with healthy ingredients so that we can give them without any guilt or fear. This is one such recipe which uses the goodness of whole wheat, Almond flour, flaxseed and butter. This makes a healthy wholesome delicious snack for kids any day.

This is one of my son's favorite snacks. He says Yummy yummy and eat it. That feeling you get when you know your kid is enjoying what you cook for him is such a state of bliss :)

This recipe is an adaptation of SharmisPassions-WholeWheat Almond Muffins. I have replaced the egg in original recipe with flax egg.

                        1 egg = 1 tbsp Flaxseed Powder dissolved in 3 tbsp of water


Yields 9 cup cakes

Ingredients

Dry Ingredients

  1. Whole Wheat flour - 3/4 cup
  2. Almond Flour - 1/4 cup
  3. Baking Soda - 1/4 tsp
  4. Cane Sugar/Organic Jaggery - 1/2 cup
  5. Cinnamon Powder - 1/2 tsp (Optional)

Wet Ingredients

  1. Flax Egg - 1 tbsp Flaxseed Powder dissolved in 3 tbsp of water (rest for 15 mins)
  2. Boiled Milk - 1/2 cup
  3. Unsalted Butter - 1/4 cup
  4. Vanilla Essence - 1 tsp


Method

1. Sift all the dry ingredients in a large mixing bowl and mix well.

2. Now add all the wet ingredients and mix well using a hand mixer or Blender until the wet ingredients and dry ingredients are combined well.


Cupcake batter ready
                              
3. Line a cupcake liner inside silicon moulds. Alternatively, you can use a muffins tray if it would fit inside your oven.

4. Fill each of the mould upto half of the volume as the batter would rise during baking process.


Batter filled in the moulds
                                 
5. Once filled, decorate them with your choice of sugar sprinklers as shown in the pic.


6. Preheat the oven at 180 degrees celsius for 10 mins.

7. Place the cupcake tray inside the oven and bake for 30 mins at 180 degrees Celsius.

8. After 30 mins, remove the cup cake and allow it cool to room temperature.

9. Can be refrigerated in an airtight box for about a week.

10. Keep one daily for your toddler in his/her snack box and see them glee :)


Notes,Tips & Add-On's

  1. Each oven temperature and heating capacity is different. My oven cooks only after 30 mins. However, I request you to keep checking on the cup cakes every 10 mins.
  2. Gently press the top of the cake to see if it is firm, alternatively you can also use tooth pick to check if the cake is cooked in the center. The tooth pick has to come out clean.
Cup cake with icing done

Wednesday, 11 September 2019

Vegan Banana Bread

I have been googling a lot to find some healthy snack options for my kid which I can pack for him and send it to school. That is when I bumped on to this recipe. I am an amateur baker and still learning. I have had my bad day at baking where my cake has been either burnt or got hard or never raised. I am still figuring out the various reasons and nuances of baking and trying to fine tune the art of baking. This is a recipe picked from Veg Recipes of India and you can refer the recipe here.

I don't have an OTG and am using a normal convection mode Panasonic microwave oven. The cakes baked from OTG definitely looks more professional in terms of texture and color compared to convection oven cooking. Still, you can achieve a close enough texture and softness from convection oven by following proper tips, understanding your oven and setting the right temperature.

Baking to me has always been like a chemistry lab experiment, you add the right ingredients in right amount and there you have the final output :P:P I generally haven't had the courage to play around with ingredients due to the fear of they not turning out properly. In the picture, I have used granulated white sugar. But I suggest you to use unrefined brown sugar or cane sugar instead to make it a healthy option for kids.


This recipe turned out really well for me and my kid also loved it. I will share certain tips that I followed to prevent major mishaps while baking in order to get a smooth soft cake. Follow the exact steps and ingredient amounts to get it perfect. :)


Ingredients

  1. Whole Wheat flour - 3/4 cup
  2. All purpose flour - 3/4 cup
  3. 4 medium sized over ripe bananas
  4. Olive Oil - 1/3 cup
  5. Unrefined sugar/cane sugar - 3/4 cup
  6. Vanilla extract - 1 tsp
  7. Cinnamon Powder - 3/4 tsp
  8. Baking Powder - 1.5 tsp
  9. Baking Soda - 1/2 tsp


Method

1. Take a bowl and mash the banana and sugar together into a puree using hand blender or even mixer. I have used White sugar here, but pls substitute with unrefined brown/cane sugar for kids as its healthy.


2. Add  cinnamon powder and Vanilla extract to the puree for flavour enhancement.


3. Add olive oil. This provides the extra softness to the cake as this an eggless cake.


4. Sieve the flour (Maida+Whole Wheat Atta) and add it to the above wet ingredients.


5. Mix the batter using (Cut and Fold Method) to ensure the wet and dry ingredients are combined evenly. Do not over do it. Stop when both wet and dry ingredients have combined in right proportion.

6. Grease and dust a bread loaf pan with flour, transfer the bread batter to the pan. Tap twice and level it.


7. Preheat the oven at 180 degree Celsius for 10 mins. After the preheat temperature is set, cook the batter for 40 mins.

Tip 1: After first 20 mins of baking, cover the top of the pan with a wet cloth or wet butter paper. This is done to allow the centre of the batter to get cooked without burning the top. The centre takes long for getting cooked. Wet the cloth/paper every now and then and place it on the top to prevent burning through the entire baking process. The browning of top varies from oven to oven. So if you feel the browning of top happens quickly, then start covering the top much earlier.

Tip 2: After 40 mins, insert a toothpick in the middle of the bread and take it out. If it comes out clean, then the bread has been cooked well and you can remove it from oven.

If not, bake for another 10 more mins and repeat the toothpick step.


8. Allow the bread to cool down on its own completely and remove it from the loaf pan by inverting it.

9. You can store this cake in fridge in an airtight container for about 5 days. Warm the cake  before serving :):)


Monday, 5 August 2019

Real Strawberry Cake with Strawberry Icing

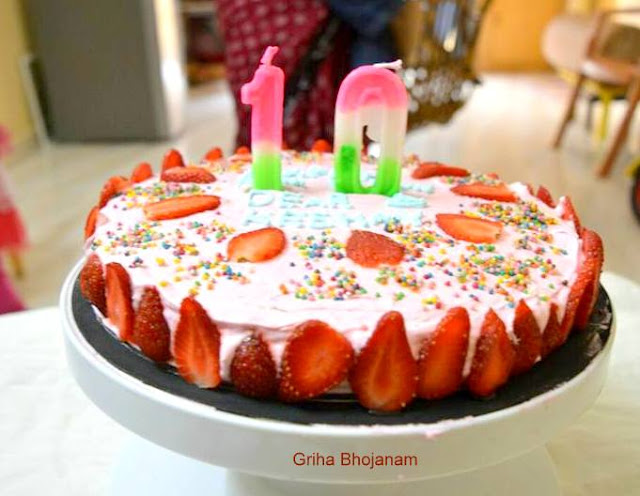
This indeed a very special and close to my heart cake. First time I tried attempting a strawberry cake with strawberry icing. This came out really well and very tasty too.  I made this cake for my elder nephew on his 10th birthday. It was a very small home bound celebration. This cake and the icing is made using fresh strawberries. The writing has been done with Blue color icing. I used blue food color and icing sugar to accomplish the same. This is a very humble attempt by me despite being a beginner in baking.


Friday, 12 July 2019

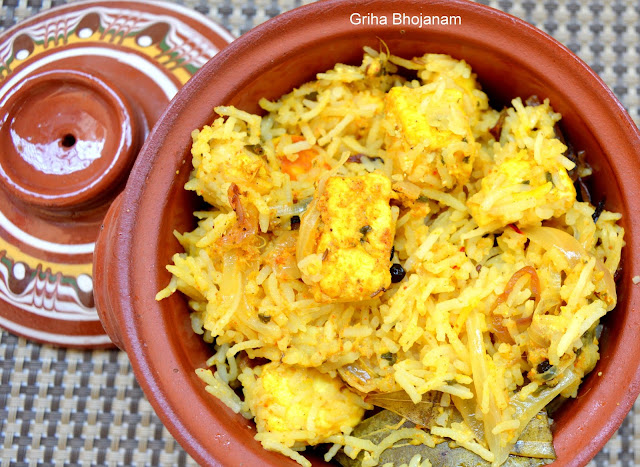
Methi Chaman Briyani (Paneer Methi Briyani)

Another interesting recipe from the masterchef Venkatesh Bhat from his briyani special episode (Watch the full episode here) which I tried for a sunday lunch. I have always been a big fan of him and I still have plenty of recipes from his collections yet to be tried. Never knew Briyanis can be made in so many different variations with different ingredients and flavours. He comes out with varied briyani varieties, that too vegetarian :):)

This is one such vegetarian briyani recipe, that uses juicy paneer(cottage cheese) and Methi. This aroma of Methi is the punch for this recipe. Hence, I do not add coriander or pudhina to this briyani as it might overshadow the significant aroma of Methi leaves.

This is my favourite combo and making this into briyani was really exciting. Let's quickly check out the recipe for this mild, aromatic and flavourful chunky Briyanis.


Ingredients

  1. Fresh fenugreek leaves (methi) - 1/2 small bunch
  2. Paneer (cottage cheese) - 200 gms (cut into cubes)
  3. Basmati Briyani Rice - 1.5 cups
  4. Saffron (kesar) - 6-7 strands
  5. Milk - 1/2 cup
  6. Ghee - 3 tablespoons
  7. Onions - 3 large (Thinly sliced)
  8. Green chillies - 2 slit
  9. Fried onions - 1/2 cup
  10. Ginger garlic paste - 1 tbsp
  11. Salt - 1.5 tsp

Masala Ingredients

  1. Green cardamoms - 2
  2. Black cardamom - 1
  3. Cloves - 3-4
  4. Cinnamon -1 inch stick
  5. Bay Leaf - 1
  6. Black peppercorns - 5-6

For Marination

  1. Thick Yogurt - 1 Cup
  2. Turmeric powder - 1 tsp
  3. Ginger Garlic Paste - 2 tbsp
  4. Coriander powder - 2 tbsp
  5. Roasted Cumin powder - 1 tbsp
  6. Red chilli powder - 1 tsp
  7. Garam masala powder - 2 tsp
  8. Needed Salt


Method

Marinating the Paneer

1. Marinate the paneer cubes with ingredients listed under "Marination". Let the paneer cubes remain soaked in the marinated yogurt mixture for half hour. This helps all the flavours to be absorbed inside the paneer and also helps it become soft.


Paneer cubes marinated in yogurt and spices

Cooking the Basmati Rice

2. Wash the Basmati Rice 2 times well for the excess starch to get rinsed off. Boil the basmati rice with a tbsp of ghee ,enough water and 1.5 tsp of salt till it is cooked about 90 percent. Drain the rice and keep it aside for dum cooking with the gravy. You can feel it by breaking the rice. 


90 percent Cooked Basmati Rice

Preparing Methi Paneer Gravy

3. Discard the roots of the methi leaves. Chop the leaves and tender stem part finely. Wash them thoroughly to get rid of mud and the bitter taste.

4. Heat a heavy bottomed pan, add ghee and all ingredients under "Masala". Add Onions,green chili and ginger garlic paste. Saute well until the onions are cooked and become translucent.

5. Add the marinated paneer, methi leaves and fried onions and mix well. Add needed amount of salt after checking. Cook the mixture on low flame for about 10 mins.

Preparing the Methi paneer gravy

Layering of Briyani

1. Soak strands of saffron in 1/2 cup of warm milk overnight or for about half hour.


Saffron soaked milk


2. Take a big heavy bottomed pan/cooker for dum cooking.

3. Layer the Methi Paneer gravy first. Add the remaining rice on top of the gravy as second 

layer.


Layering of Paneer Methi Masala


4. Sprinkle the saffron + milk all over the rice as shown in the picture.


Layering of rice topped with Saffron milk


Dum cooking

5. Place a Dosa Tawa on flame. Transfer the dum cooking handi/pressure cooker pan to dosa tawa and cover the pan tightly so that no heat escapes.( as shown below)

6. Cook for about 15 mins on low flame with the pan fully sealed.


7. Methi Chaman Briyani is all ready and piping hot to be served along with any raita of your choice :)


Wednesday, 3 July 2019

Sprouted Green Moong and Vegetable salad

A healthy, protein rich nutritious salad that has all the flavours balanced perfectly. This can make a great evening snack or a satisfying breakfast. My mother often makes this and pack it for my lunch. Just love the way she prepares this. 

This also has goodness of all raw vegetables thereby increasing the fiber content. A delectable tasty salad that is absolutely sin free and satiates your hunger instantly keeping you full for long time. I have described in details about how to sprout green gram here. This is an ideal salad for weight loss and people who are trying to build muscles.


Serves:4 small bowls

Ingredients

  1. Sprouted green gram-2 cups
  2. Onions - 1 medium sized
  3. Banglore Tomatoes - 1 big/medium sized
  4. Carrot- 1 small/medium sized
  5. Capsicum - 1/4 cup (chopped)
  6. Cucumber - 1/2 cup (chopped)
  7. Baby corn - 4 (sliced round round)
  8. Green Chili - 1 finely chopped (optional)
  9. Pomegranate pearls - 3 tbsp
  10. Red chili powder-1/4 tsp
  11. Chat Masala Powder - 1 tsp
  12. Cumin powder - 3/4 tsp
  13. Lemon Juice - 1 tsp
  14. Salt as needed
  15. Black salt as needed
  16. Coriander for garnishing


Method

1. Mix all the ingredients mentioned under ingredient list in a mixing bowl,

2. Garnish with some fresh coriander leaves and serve fresh.


How to sprout green gram

I used to buy sprouts every time from market until I realized that this can be made at home very easily. The sprouting process increases nutrient levels, making sprouts richer in protein, folate, magnesium, phosphorus, manganese and vitamins C and K than unsprouted plants. These sprouted green gram can be stored for a week in freeze/ fridge and can be used for salads, dosa and various dishes.


Method

1. Was and soak the raw green gram in water for about 12 hours.

2. Drain the green gram completely. Store them in a hotpack with lid closed for another 12 hours.Alternatively, you can cover and tie the green gram in a muslin cloth and leave them overnight.

3. After 12 hours, you can find the sprouts germinated. :)


Tuesday, 2 July 2019

Momo Chutney

Momos are nothing without their pair- those drooling spicy Momo Chutney. When these momos are dipped in spicy hot momo chutney, the taste is sure to sizzle your tongue with exotic taste. Let's look into the preparation of momo chutney.


Serves:3

Ingredients

To Grind


  1. Tomatoes - 3 big chopped
  2. Dry Red Chilies - 6
  3. Garlic - 5 cloves
  4. Soy Sauce - 1 tsp
  5. Water as needed for grinding

For Sauteing

  1. Sesame oil - 3 tbsp
  2. Sugar - 1 tsp
  3. Salt to taste


Method

1. Grind all ingredients listed under "To Grind" in a mixer with required water to a paste.

2. Heat a thick bottomed pan, add sesame oil and the ground mixture to the pan. Saute the chutney on a low flame for about 7 mins for the raw flavour of garlic and tomato to go off.

3. Add salt and sugar and mix well. The oil separates from chutney after 7 mins of cooking. This is the right time to switch off the flame. Transfer the chutney to a mini bowl.

4. Serve the piping hot Momos with this spicy hot chutney.


Thursday, 13 June 2019

Malai Kofta

A royal,delicious and a very famous menu in every restaurant. These succulent juicy kofta immersed in rich creamy gravy is sure to leave your mouth watering. Malai means cream, in other words richness or royal. This combines everything that is rich like cashews, fresh cream and paneer as main ingredients.You can make this either as a white gravy completely by ignoring tomatoes as well.However, I have used tomatoes as I had some fresh tomatoes in stock with me. Either way, this will taste awesome. This is a mildly sweet gravy very similar to paneer butter masala.This goes very well with Butter Naan or any other Indian Breads. Learn to make this simple easy recipe at home without much fuss.


Ingredients

Base Onion Tomato Gravy

  1. Onions - 3(Big)
  2. Banglore Tomatoes - 2 (Big)
  3. Cashew Nuts - 12-15
  4. Poppy seeds/Khus Khus - 2 tbsp
  5. Green Chili - 2 small or 1 big
  6. Water - 2 cups


Kofta

  1. Paneer - 200 gms (Grated)
  2. Raisins - 2 tbsp
  3. Cashews - 2 tbsp (chopped)
  4. Potato - 3 big(boiled, peeled and smashed)
  5. Needed Salt
  6. Corn flour - 2 tbsp (for binding)
  7. Maida/All purpose flour - Dusting
  8. Oil for deep frying

Other Ingredients

  1. Butter - 2 tbsp
  2. Bay leaf - 1
  3. Green Cardamon - 2
  4. Cloves - 2
  5. Pepper powder - 1 tsp
  6. Ginger garlic paste - 1 tsp
  7. Coriander powder - 1 tsp
  8. Turmeric powder - 1/2 tsp
  9. Garam Masala Powder - 1/2 tsp
  10. Needed salt
  11. Sugar - 3 tsp
  12. Fresh Cream - 2 tbsp
  13. Kasuri Methi (crushed) - 1 tsp

Method

Gravy Preparation

1. Boil all ingredients under "Gravy" for about 5 mins. The skin of tomatoes come off. Once the contents are cooled, blanch the tomatoes. ( see more on blanching tomatoes).


2. Grind the contents to a smooth paste.

3. Heat butter in a pan, add bay leaf, cloves and cardamom and saute well.

4. Add ginger garlic paste and saute well for the raw flavor to go off.

5. Add the ground gravy mixture to the pan and saute well.


6. Add all the powders mentioned in other ingredients and needed salt to saute well.

7. Cover the lid and allow it to simmer for 10 mins.

8. After 10 mins, the gravy would have cooked well and the raw taste would have gone completely.

9. Mix well and add needed water (if gravy has become too thick).

10. Add sugar and fresh cream and give it a good stir.

11. Add some crushed kasuri Methi and switch off the flame.


Kofta preparation

1. Mix mashed aloo,grated paneer and corn flour together. Combine well so that the contents mix homogeneously.


2. Add green chili, cashew bites and raisins and combine well as shown in the pic.

3. Form cylindrical shape koftas with hand and dust them evenly in maida flour. The koftas should be uniformly coated well with flour.


4. Deep fry them in hot oil till the koftas turn golden brown. ensure the flame is medium so that the koftas do not turn black immediately.

5. Keep the koftas aside.


Assembling

1. On a plate, gently pour a ladle of the creamy gravy. Place the koftas above it.

2. Garnish with beaten fresh cream and serve them hot with Butter Naan or any other Indian Breads.


Notes,Tips & Add-On's

  1. Presence of cashew makes the gravy thick. You can adjust water accordingly to make it  a creamy consistency.Make sure you don't add much.
  2. Dusting the koftas helps in uniform covering of koftas. While frying, it gives uniform coloring.


Thursday, 25 April 2019

Kabuli Channa Salad (Black Channa Salad)

Black channa is definitely a healthy option when compared to white channa due to presence of high fiber in it. Presence of high fibre helps you keep satiated for long hours. Also, helps in bowel movement and indirectly in weight reduction. Low in carb, absolutely vegan,no fat and high protein and fibre makes this an ideal snack for weight loss. A complete sin-free and tasty indulgence.


Serves:2

Ingredients


  1. Uncooked Black chana/chickpeas - 1 cup
  2. Onions - 1 small/medium sized
  3. Banglore Tomatoes - 1 big/medium sized
  4. Carrot- 1/4 cup chopped
  5. Capsicum - 1/4 cup (chopped)
  6. Cucumber - 1/4 cup (chopped)
  7. Raw mango - 1/4 cup (chopped)
  8. Red chili powder-1/2 tsp
  9. Chat Masala Powder - 1 tsp
  10. Cumin powder - 3/4 tsp
  11. Lemon Juice - 1 tsp
  12. Crushed Mint leaves - few
  13. Salt as needed
  14. Black salt as needed

Method

1. Soak the channa overnight for about 8-9 hours.

2. Pressure cook channa with 2 tsp salt and enough water for 7 whistles.

3. Drain the cooked chickpeas/channa.

4. Mix all the ingredients mentioned along with black channa. Crushed pudhina leaves add nice aroma and flavour to this salad.

5. Enjoy snacking this healthy salad.